
Deployment of Python Web Application on AWS
Jan shows how you can deploy a Python web application using various AWS services.
Overview
The deployment of an application, and the automation of the process is one of the most important steps in developing and publishing modern web applications. Luckily AWS provides a number of tools necessary for a fast and reliable deployment. But finding and using the right tool can be a challenge. We will showcase one of the many ways to set up an application. With the exception of Terraform for the infrastructure deployment, we will exclusively use AWS Services for this example.
Prerequisites
Before starting working on this guide, a few requirements need to be met. The following tools are necessary to follow this article:
- A configured AWS CLI preferably with Administrator Access to the account. - Guide
- Installed Terraform - Download
The project
We have a small example application written in Flask which we want to deploy. The application uses a MySQL database backend. While the application source code itself is not important for the scope of this article, we still need to take a look at the database integration later on. You can use your own application but may need to change the database integration to match with this example.
The plan is to deploy the application onto a group of EC2 instances. These instances will be managed by an Auto Scaling Group which will scale the number of the instances automatically. To distribute the requests, an Elastic Load Balancer will be used. For the database backend we will be using a RDS instance with MySQL as engine. The Database secrets will be stored in a Secret Manager object. To provide a CI/CD process we will be using a simple CodePipeline with CodeCommit and CodeDeploy.
Important parts in the Code
While the overall source code of the application is out of the scope of this article, we still need take a look at a few parts.
The CodeDeploy File
In the root directory of the project/repository we need a file called appspec.yml. This file defines the steps CodeDeploy will take to deploy the application. It will tell the agent where to put the application,
and how to launch it.
 1# appspec.yml
 2
 3version: 0.0
 4os: linux
 5files:
 6  - source: /
 7    destination: /opt/app
 8hooks:
 9  AfterInstall:
10    - location: deploy/install_server.sh
11      timeout: 300
12      runas: root
13  ApplicationStart:
14    - location: deploy/server_start.sh
15      timeout: 300
16      runas: root
17  ApplicationStop:
18    - location: deploy/server_stop.sh
19      timeout: 300
20      runas: root
In our example case we have 3 steps defined. The first will install the application. In our case we will run 3 different scripts. The install script will create a systemd service and install the project dependencies. The start and stop hooks can start and stop the service when CodeDeploy needs it to. This is needed for example to deploy new releases.
1# install_server.sh
2
3#!/bin/bash
4cd "$(dirname "$0")"
5pip3 install -r ../application/requirements.txt
6cp ./app.service /etc/systemd/system/app.service
1# server_start.sh
2
3#!/bin/bash
4systemctl start app.service
1# server_stop.sh
2
3#!/bin/bash
4systemctl stop app.service
Database integration in the source code
The database connection is done by the standard MySQL driver. The important part is that the application gets the connection credentials from the AWS Secrets Manager. This can be done in Python by utilizing the boto3 module. Make sure to include the module in the requirements.txt of your project.
# requirements.txt

boto3
[...]
Now in the code we need to get the secret from the secret manager. We do not need any additional credentials to get the secret from the manager. We allow the instance to get this specific secret in the IAM role for the EC2 instance. Thus the instance can access the resource via the SDK by utilizing the role. The only information we need is the name of the secret which we store in an environment variable in the systemd service.
 1# models.py
 2
 3import boto3
 4from botocore.config import Config
 5import mysql.connector
 6[...]
 7
 8my_config = Config(
 9    region_name = "eu-central-1"
10)
11secrets_client = boto3.client("secretsmanager",config=my_config)
12secrets = json.loads(self.__get_secret_value(str(os.environ.get("DB_SECRETS_NAME")))["SecretString"])
13
14conn = mysql.connector.connect(
15    user=secrets["username"],
16    host=secrets["host"],
17    database=secrets["dbname"],
18    password=secrets["password"]
19)
20[...]
Infrastructure
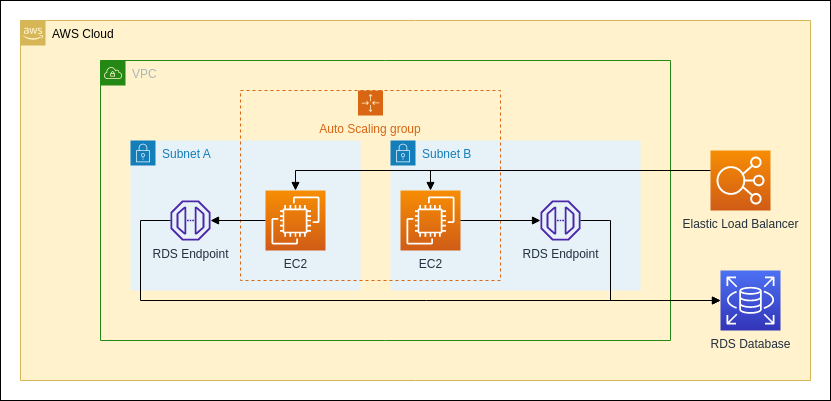
This image shows the logical infrastructure of the projects deployment
Deployment
Terraform is an Infrastructure as a code (IaC) tool which is able to provision and manage large deployments on cloud providers like AWS. It will handle the deployment of all resources except the CodeCommit Repository, which will be provisioned outside of Terraform. This is so we can destroy the instance without deleting the source repository.
We will define a lot of resources for the deployment. To make it easier to get an overview of the deployment, a graph will be placed at the beginning of each of the deployment sections. To better understand the graphs, please refer to this legend.
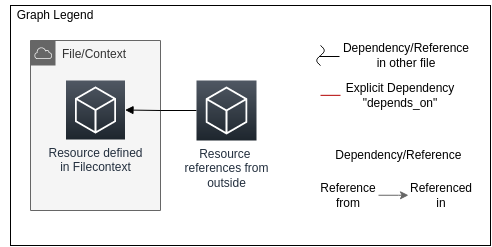
Be aware that the graphs only show the dependencies of the Terraform deployments. The application itself might have different dependencies than shown in the infrastructure graph.
Source Repository
The first step is to set up a CodeCommit repository to host the source code. This can be done either via the Management Console or via the AWS CLI.
aws codecommit create-repository --repository-name url_shortener --repository-description "Url Shortener Repository" --tags Project=url-shortener
Alternatively, the code can also be hosted on another source code provider like GitHub. For this, the pipeline will need to be configured differently than described in this article.
Terraform Setup
Now we can begin with setting up the Terraform Project. For this we will need a project folder which will contain our Terraform Files. Since this project will require a lot of resources it is recommended to split the code into several files to make reading and editing easier. This guide will do this and will state the name of the used filename for the resource described.
First we need to configure the Terraform Backend and the provider. Since we work with AWS the AWS Provider will be needed. We also define the AWS Region in which we will deploy our application. We will be using eu-central-1 (Frankfurt) in this example.
 1# provider.tf
 2
 3terraform {
 4  required_providers {
 5    aws = {
 6      source  = "hashicorp/aws"
 7      version = "~> 4.0"
 8    }
 9  }
10}
11
12provider "aws" {
13  region  = "eu-central-1"
14  profile = "default"
15}
Variables
Variables in Terraform are used to avoid repeating frequently used parameter values. We will use one variable in this project.
It is only used to add the project name to the tags and name of the resources and tags.
Feel free to define your own project name here.
Whenever there is a var.project_name or ${var.project_name} in the value, it will refer to the default value of the variable.
1# variables.tf
2
3variable "project_name" {
4  type    = string
5  default = "<Project Name>"
6}
Network
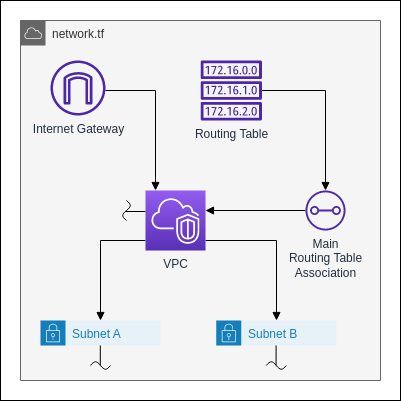
Now we can start creating the infrastructure. We will begin with the network resources. This includes the VPC and subnets.
The first step is to define an Internet Gateway. The Internet Gateway connects the VPC and its subnets with the internet.
1# network.tf
2
3resource "aws_internet_gateway" "default" {
4  vpc_id = aws_vpc.default.id
5  tags = {
6    name    = "${var.project_name}_gw"
7    project = var.project_name
8  }
9}
Next we need a routing table. This will be the main routing table for the VPC. It will direct the network traffic for the whole VPC. The only rule it needs is to redirect the traffic to any external address to the Internet Gateway.
 1# network.tf
 2
 3resource "aws_route_table" "default" {
 4  vpc_id = aws_vpc.default.id
 5  route {
 6    cidr_block = "0.0.0.0/0"
 7    gateway_id = aws_internet_gateway.default.id
 8  }
 9  tags = {
10    name    = "${var.project_name}-routing_table"
11    project = var.project_name
12  }
13}
The next resource is the VPC itself. All we need to configure for it is the IP Address Block. We will go with a /16 CIDR network here.
1#network.tf
2
3resource "aws_vpc" "default" {
4  cidr_block = "172.0.0.0/16"
5  tags = {
6    name    = "${var.project_name}-vpc"
7    project = var.project_name
8  }
9}
We also need to associate the routing table we defined earlier with VPC. For this we need another resource.
1# network.tf
2
3resource "aws_main_route_table_association" "default" {
4  vpc_id         = aws_vpc.default.id
5  route_table_id = aws_route_table.default.id
6}
Now we can define the subnets of the VPC. The subnets will contain the EC2 Instances and the RDS Endpoints. The two subnets
need to be
located in two different Availability Zones. Otherwise we cannot define an Auto Scaling Group later. In this example
we will be deploying in the eu-central-1 (Frankfurt Region), thus the Availability Zone here will be eu-central-1a and eu-central-1b.
 1# network.tf
 2
 3resource "aws_subnet" "subnet_a" {
 4  vpc_id                  = aws_vpc.default.id
 5  availability_zone       = "eu-central-1a"
 6  cidr_block              = "172.0.10.0/24"
 7  map_public_ip_on_launch = true
 8  tags = {
 9    name    = "${var.project_name}-subnet_a"
10    project = var.project_name
11  }
12}
13
14resource "aws_subnet" "subnet_b" {
15  vpc_id                  = aws_vpc.default.id
16  availability_zone       = "eu-central-1b"
17  cidr_block              = "172.0.20.0/24"
18  map_public_ip_on_launch = true
19  tags = {
20    name    = "${var.project_name}-subnet_b"
21    project = var.project_name
22  }
23}
Security Groups/IAM Roles/Secrets
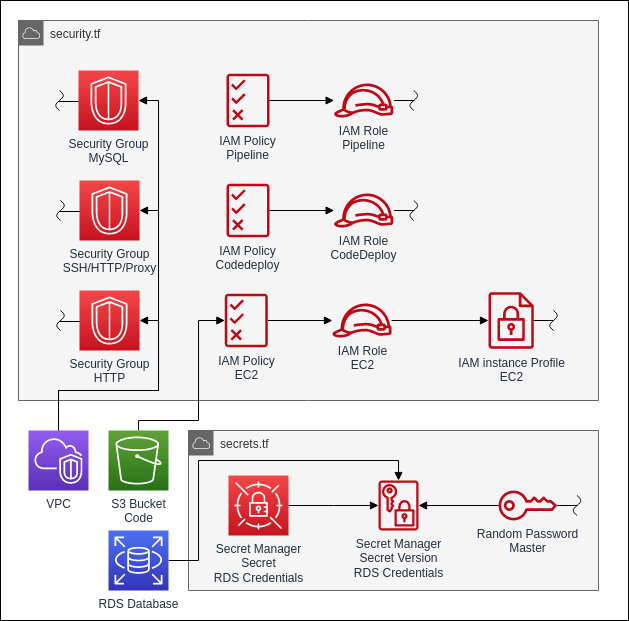
The next resources we define will be related to the security and access between the different resources we will define later on. This include 3 types of resources: Security Groups, IAM Roles and secrets.
Security groups define the network access rules for EC2 instances and other related services like Load Balancers and RDS Databases.
They contain explicit allow rules for incoming and outgoing traffic.
The first security group will be attached to the RDS Database instance later on. It allows only incoming MySQL traffic from the internal VPC network.
 1# security.tf
 2
 3resource "aws_security_group" "mysql" {
 4  name   = "${var.project_name}-sg-mysql"
 5  vpc_id = aws_vpc.default.id
 6
 7  ingress {
 8    description = "Mysql from Internal Network"
 9    from_port   = 3306
10    to_port     = 3306
11    protocol    = "tcp"
12    cidr_blocks = ["172.0.0.0/16"]
13  }
14
15  tags = {
16    name    = "${var.project_name}-sg-mysql"
17    project = var.project_name
18  }
19}
The next security group will be attached to the EC2 instances. It allows incoming traffic to the SSH port from everywhere.
This is not strictly necessary and can be left out if no SSH access to the machine is required. We will leave this open here
to help with debugging the application and the deployment later on. In a strict production environment this port should be closed.
We also allow access to the port 8080 under which the Flask application will run later. We limit the access to the load balancer.
This is achieved by assigning the security group, which will later be assigned to the load balancer, instead of a CIDR block.
Also we need an outgoing any rule to be able to update the instance in the future.
 1# security.tf
 2
 3resource "aws_security_group" "ssh_http_proxy" {
 4  name   = "${var.project_name}-sg-ssh-http-proxy"
 5  vpc_id = aws_vpc.default.id
 6
 7  # Leave out this block if you do not need SSH access to the instances.
 8  ingress {
 9    description = "SSH from Everywhere"
10    from_port   = 22
11    to_port     = 22
12    protocol    = "tcp"
13    cidr_blocks = ["0.0.0.0/0"]
14  }
15
16  ingress {
17    description = "HTTP from Load Balancer"
18    from_port   = 8080
19    to_port     = 8080
20    protocol    = "tcp"
21    security_groups = [aws_security_group.http.id]
22  }
23
24  egress {
25    from_port   = 0
26    to_port     = 0
27    protocol    = "-1"
28    cidr_blocks = ["0.0.0.0/0"]
29  }
30
31  tags = {
32    name    = "${var.project_name}-sg-ssh-http-proxy"
33    project = var.project_name
34  }
35}
Now we define the group for the load balancer. It will only allow incoming HTTP traffic and outgoing traffic to the proxy port of internal addresses in the VPC.
 1# security.tf
 2
 3resource "aws_security_group" "http" {
 4  name   = "${var.project_name}-sg-http"
 5  vpc_id = aws_vpc.default.id
 6
 7  ingress {
 8    description = "HTTP from Everywhere"
 9    from_port   = 80
10    to_port     = 80
11    protocol    = "tcp"
12    cidr_blocks = ["0.0.0.0/0"]
13  }
14
15  egress {
16    from_port   = 8080
17    to_port     = 8080
18    protocol    = "tcp"
19    cidr_blocks = ["172.0.0.0/16"]
20  }
21
22  tags = {
23    name    = "${var.project_name}-sg-ssh"
24    project = var.project_name
25  }
26}
Those are all the security groups we need for the project. Now we can start defining the IAM roles for the project. The IAM roles will allow AWS Services to connect and work with other AWS Services.
The first one we need is to allow the EC2 instance to access the services it needs to run and to deploy applications. It will allow the instance to connect to an S3 bucket where the deployment file will be put by CodeDeploy later, to the RDS database for the application and to the secret stored in AWS Secrets Manager. This role will have 3 seperate resources which it will need to function. First the role itself which defines who can assume this role, then the policy, which will define all the permission it can utilize, and finally an instance profile which enables us to attach the role to the EC2 instances. The profile is only needed for the EC2 role.
 1# security.tf
 2
 3resource "aws_iam_role" "ec2" {
 4  name   = "${var.project_name}-role-ec2"
 5
 6  # While AWS IAM policies are declared in JSON,
 7  # we use Terraform Maps to define the policies here.
 8  # The jsonencode function will convert it into a JSON Document during deployment.
 9  assume_role_policy = jsonencode({
10    Version = "2012-10-17"
11    Statement = [
12      {
13        Action = "sts:AssumeRole"
14        Effect = "Allow"
15        Principal = {
16          Service = "ec2.amazonaws.com"
17        }
18      },
19    ]
20  })
21  inline_policy {}
22  managed_policy_arns = [aws_iam_policy.ec2.arn]
23  tags = {
24    name    = "${var.project_name}-role-ec2"
25    project = var.project_name
26  }
27}
28
29resource "aws_iam_policy" "ec2" {
30  name   = "${var.project_name}-policy-ec2"
31
32  policy = jsonencode({
33    Version = "2012-10-17"
34    Statement = [
35      {
36        Action = [
37          "rds:*"
38        ]
39        Effect   = "Allow"
40        Resource = "*"
41      },
42      {
43        Action = [
44          "s3:*"
45        ]
46        Effect   = "Allow"
47        Resource = "${aws_s3_bucket.code_bucket.arn}/*"
48      },
49      {
50        Action = [
51          "secretsmanager:GetSecretValue"
52        ]
53        Effect   = "Allow"
54        Resource = "${aws_secretsmanager_secret.rds_credentials.arn}"
55      },
56    ]
57  })
58  tags = {
59    name    = "${var.project_name}-role-ec2"
60    project = var.project_name
61  }
62}
63
64resource "aws_iam_instance_profile" "ec2" {
65  name = "${var.project_name}-profile-ec2"
66  role = aws_iam_role.ec2.name
67}
The next role is for the CodeDeploy service. It will need permissions to the Auto Scaling Group and the EC2 instance. It needs to be able to access these resources to be able to deploy the application to the instances.
 1# security.tf
 2
 3resource "aws_iam_role" "codedeploy" {
 4  name = "${var.project_name}-role-codedeploy"
 5
 6  # Terraform's "jsonencode" function converts a
 7  # Terraform expression result to valid JSON syntax.
 8  assume_role_policy = jsonencode({
 9    Version = "2012-10-17"
10    Statement = [
11      {
12        Action = "sts:AssumeRole"
13        Effect = "Allow"
14        Principal = {
15          Service = "codedeploy.amazonaws.com"
16        }
17      },
18    ]
19  })
20  inline_policy {}
21  managed_policy_arns = [aws_iam_policy.codedeploy.arn]
22  tags = {
23    name    = "${var.project_name}-role-codedeploy"
24    project = var.project_name
25  }
26}
27
28resource "aws_iam_policy" "codedeploy" {
29  name = "${var.project_name}-policy-codedeploy"
30
31  policy = jsonencode({
32    Version = "2012-10-17"
33    Statement = [
34      {
35        Action = [
36          "ec2:*",
37          "autoscaling:*"
38        ]
39        Effect   = "Allow"
40        Resource = "*"
41      },
42    ]
43  })
44  tags = {
45    name    = "${var.project_name}-policy-codedeploy"
46    project = var.project_name
47  }
48}
The last role we need is for the CodePipeline. Firstly it needs access to CodeCommit and CodeDeploy to trigger both services for the pipeline. Lastly it needs access to the S3 bucket to upload the Deployment file.
 1# security.tf
 2
 3resource "aws_iam_role" "pipeline" {
 4  name = "${var.project_name}-role-pipeline"
 5
 6  assume_role_policy = jsonencode({
 7    Version = "2012-10-17"
 8    Statement = [
 9      {
10        Action = "sts:AssumeRole"
11        Effect = "Allow"
12        Principal = {
13          Service = "codepipeline.amazonaws.com"
14        }
15      },
16    ]
17  })
18  inline_policy {}
19  managed_policy_arns = [aws_iam_policy.pipeline.arn]
20  tags = {
21    name    = "${var.project_name}-role-pipeline"
22    project = var.project_name
23  }
24}
25
26resource "aws_iam_policy" "pipeline" {
27  name = "${var.project_name}-policy-pipeline"
28  policy = jsonencode({
29    Version = "2012-10-17"
30    Statement = [
31      {
32        Action = [
33          "iam:PassRole"
34        ]
35        Effect   = "Allow"
36        Resource = "*"
37        Condition = {
38          StringEqualsIfExists = {
39            "iam:PassedToService" = [
40              "ec2.amazonaws.com"
41            ]
42          }
43        }
44      },
45      {
46        Action = [
47          "codecommit:CancelUploadArchive",
48          "codecommit:GetBranch",
49          "codecommit:GetCommit",
50          "codecommit:GetRepository",
51          "codecommit:GetUploadArchiveStatus",
52          "codecommit:UploadArchive"
53        ]
54        Effect   = "Allow"
55        Resource = "*"
56      },
57      {
58        Action = [
59            "codedeploy:CreateDeployment",
60            "codedeploy:GetApplication",
61            "codedeploy:GetApplicationRevision",
62            "codedeploy:GetDeployment",
63            "codedeploy:GetDeploymentConfig",
64            "codedeploy:RegisterApplicationRevision"
65        ]
66        Effect   = "Allow"
67        Resource = "*"
68      },
69      {
70        Action = [
71          "s3:*"
72        ]
73        Effect   = "Allow"
74        Resource = "${aws_s3_bucket.code_bucket.arn}/*"
75      },
76    ]
77  })
78  tags = {
79    name    = "${var.project_name}-policy-pipeline"
80    project = var.project_name
81  }
82}
The last thing we need to define to handle the access and permissions is the secret for the database. We will store the secret in the AWS Secrets Manager service. For this we need 2 resources.
Before we define these resources we will generate a password for the database. While we can also define the password statically, it is safer to generate it randomly. Terraform has a builtin resource which can randomly generate a password.
1# secrets.tf
2
3resource "random_password" "master"{
4  length           = 16
5  special          = true
6  override_special = "_!%^"
7}
Next we define the Secret resource. This resource will not hold the secret itself. It just defines the secret object itself.
1#secrets.tf
2
3resource "aws_secretsmanager_secret" "rds_credentials" {
4  name = "${var.project_name}-credentials"
5}
The data itself is contained in a separate resource called secret version.
This is due to versioning which the secret manager uses.
We are defining only a version of secret. After the deployment we could change the secret without losing the previous values.
The secret will contain all the information the application will need later on to connect to RDS database.
 1#secrets.tf
 2
 3resource "aws_secretsmanager_secret_version" "rds_credentials" {
 4  secret_id     = aws_secretsmanager_secret.rds_credentials.id
 5  secret_string = jsonencode({
 6          username = aws_db_instance.default.username,
 7          password = random_password.master.result,
 8          engine = "mysql",
 9          host = aws_db_instance.default.address,
10          port = 3306,
11          dbname = aws_db_instance.default.db_name,
12          dbInstanceIdentifier = aws_db_instance.default.identifier
13    })
14}
Database/S3 Storage
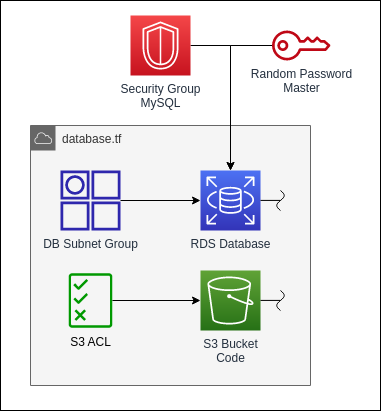
The next group of resources will be the database and the S3 storage.
For the database we use the RDS service. RDS is a managed Database Service which supports many different relational database engines like MySQL and PostgreSQL. For this example we will be using MySQL but depending on the application another engine can be used.
 1# database.tf
 2
 3resource "aws_db_instance" "default" {
 4  identifier             = "${var.project_name}-db"
 5  allocated_storage      = 10
 6  db_name                = "urls"
 7  engine                 = "mysql"
 8  engine_version         = "8.0.28"
 9  instance_class         = "db.t3.micro"
10  username               = "url_user"
11  password               = random_password.master.result
12  skip_final_snapshot    = true
13  vpc_security_group_ids = [aws_security_group.mysql.id]
14  db_subnet_group_name   = aws_db_subnet_group.default.name
15  tags = {
16    name    = "${var.project_name}-db"
17    project = var.project_name
18  }
19}
To be able to privately connect to the database from the subnets we will need endpoints in the subnets. The endpoint will be assigned an IP address in the subnets and be reachable from this address. Also the RDS DNS name will be assigned to the local IP address.
 1# database.tf
 2
 3resource "aws_db_subnet_group" "default" {
 4  name       = "${var.project_name}-db-subnet-group"
 5  subnet_ids = [aws_subnet.subnet_a.id, aws_subnet.subnet_b.id]
 6
 7  tags = {
 8    name    = "${var.project_name}-db-subnet-group"
 9    project = var.project_name
10  }
11}
Next we will define the S3 bucket for the deployment files. Be aware that the name of bucket needs to be unique across all accounts and all regions. Therefor we will not supply a bucket name here.
 1# database.tf
 2
 3resource "aws_s3_bucket" "code_bucket" {
 4  bucket = "<unique-bucket-name>"
 5  force_destroy = true
 6  tags = {
 7    name    = "${var.project_name}-bucket"
 8    project = var.project_name
 9  }
10}
To ensure that the bucket is closed for public access we will also define an S3 Bucket ACL resource which will set the ACL to private.
private is a canned ACL which will deny all access from anyone other than the owner.
1# database.tf
2
3resource "aws_s3_bucket_acl" "database_bucket_acl" {
4  bucket = aws_s3_bucket.code_bucket.id
5  acl    = "private"
6}
Auto Scaling Group
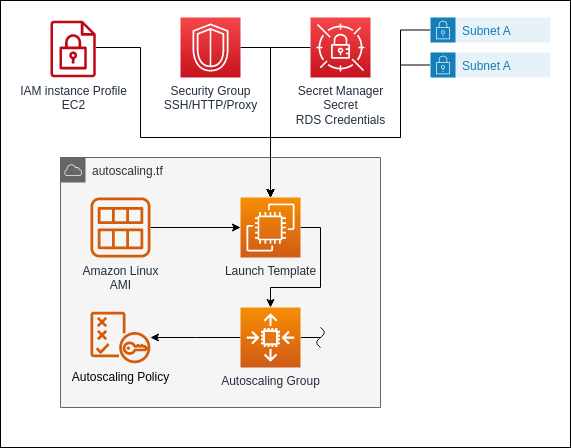
Next we define the resources for the Auto Scaling Group. The Auto Scaling Group will manage the creation of EC2 instances. With the Auto Scaling Group, the number of EC2 instances can be dynamically adjusted according to the load and usage.
The Auto Scaling Group resource itself will define the desired capacity for the Auto Scaling Group and the subnets in which the instances will be created.
 1# autoscaling.tf
 2
 3resource "aws_autoscaling_group" "default" {
 4  name = "${var.project_name}-asg"
 5  desired_capacity    = 2
 6  max_size            = 4
 7  min_size            = 1
 8  vpc_zone_identifier = [aws_subnet.subnet_a.id, aws_subnet.subnet_b.id]
 9  launch_template {
10    id = aws_launch_template.default.id
11  }
12  tag {
13    key                 = "Name"
14    value               = "${var.project_name}-instance"
15    propagate_at_launch = true
16  }
17  tag {
18    key                 = "Project"
19    value               = "${var.project_name}"
20    propagate_at_launch = true
21  }
22}
To create instances, the Auto Scaling Group needs a launch template. This template will define the type and configuration for the instances which the Auto Scaling Group will create. It also defines the userscript for the instance. The userscript will be run after the instance is created to initialize the server for its role. In our case, we install the CodeDeploy agent which will run the application deployment on the instance. We also write the name of the secret into an env file for the service unit of the application. It will use it to get the information about the database.
We also define an explicit dependency here with the depends_on parameter. This will tell Terraform
to wait with the deployment of the Launch Template until after the Secret has been created.
The reason we do this is that otherwise the instance gets created before the secret exists.
The application will then try to access the secret before it is created which might lead to errors
in the application.
 1# autoscaling.tf
 2
 3resource "aws_launch_template" "default" {
 4  name          = "url_shortener_template"
 5  image_id      = data.aws_ami.amazon-linux-2.id
 6  instance_type = "t2.micro"
 7  key_name      = "main"
 8  depends_on    = [aws_secretsmanager_secret_version.rds_credentials]
 9  network_interfaces {
10    security_groups = [aws_security_group.ssh_http_proxy.id]
11  }
12  iam_instance_profile {
13    name = aws_iam_instance_profile.ec2.name
14  }
15  tags = {
16    name    = "${var.project_name}-template"
17    project = var.project_name
18  }
19  user_data = base64encode(<<-EOF
20    #!/bin/bash
21    cd /home/ec2-user
22    yum update -y
23    yum install ruby wget python3 -y
24    wget https://aws-codedeploy-eu-central-1.s3.eu-central-1.amazonaws.com/latest/install
25    chmod +x ./install
26    sudo ./install auto
27
28    echo "DB_SECRETS_NAME=${aws_secretsmanager_secret.rds_credentials.name}" >> /etc/systemd/system/url_shortener.env
29  EOF
30  )
31}
Lastly we define an Auto Scaling Policy. It will trigger the creation or termination of instances based on the CPU load. We define that we want the CPU load of the instances to be around 40 percent.
 1# autoscaling.tf
 2
 3resource "aws_autoscaling_policy" "default" {
 4  name                   = "${var.project_name}-asg-policy"
 5  policy_type            = "TargetTrackingScaling"
 6  adjustment_type        = "ChangeInCapacity"
 7  autoscaling_group_name = aws_autoscaling_group.default.name
 8   target_tracking_configuration {
 9    predefined_metric_specification {
10      predefined_metric_type = "ASGAverageCPUUtilization"
11    }
12
13    target_value = 40.0
14  }
15}
Load Balancer
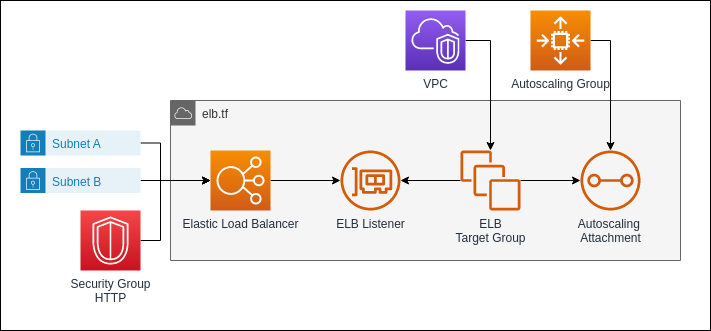
As the last infrastructure resource we define the load balancer. It will distribute the requests to the website endpoint evenly across all EC2 instances in the Auto Scaling Group.
The load balancer resource itself sets up the type of the load balancer and defines in what subnets it will be available. It will need at least 2 subnets in different Availability Zones to ensure a better availability in case of a Zone outage. Due to it being attached to the subnets, we also need to attach a Security Group to the load balancer.
As type we will be using an Application Load Balancer. It operates directly with the HTTP Protocol. It is therefore the best choice for web applications.
 1# elb.tf
 2
 3resource "aws_lb" "default" {
 4  name                       = "${var.project_name}-lb"
 5  internal                   = false
 6  load_balancer_type         = "application"
 7  security_groups            = [aws_security_group.http.id]
 8  subnets                    = [aws_subnet.subnet_a.id, aws_subnet.subnet_b.id]
 9  enable_deletion_protection = false
10  tags = {
11    name    = "${var.project_name}-lb"
12    Project = var.project_name
13  }
14}
The Load Balancer requires a listener which will expose a port to the internet. In our case we will set up a HTTP Listener, but the Application Load Balancer also supports HTTPS Protocol. In this case it will require a SSL/TLS Certificate.
 1# elb.tf
 2
 3resource "aws_lb_listener" "listener_http" {
 4  load_balancer_arn = aws_lb.default.arn
 5  port              = 80
 6  protocol          = "HTTP"
 7  default_action {
 8    target_group_arn = aws_lb_target_group.default.arn
 9    type             = "forward"
10  }
11}
Lastly the Load Balancer will need a target group. It will connect the internal endpoints. In our case we will attach the Auto Scaling Group to it. This way, the target group will automatically attach the instances the Auto Scaling Group creates.
 1# elb.tf
 2
 3resource "aws_lb_target_group" "default" {
 4  name        = "${var.project_name}-tg"
 5  target_type = "instance"
 6  port        = 8080
 7  protocol    = "HTTP"
 8  vpc_id      = aws_vpc.default.id
 9}
10
11resource "aws_autoscaling_attachment" "asg_attachment_bar" {
12  autoscaling_group_name = aws_autoscaling_group.default.id
13  lb_target_group_arn    = aws_lb_target_group.default.arn
14}
CodeDeploy and CodePipeline
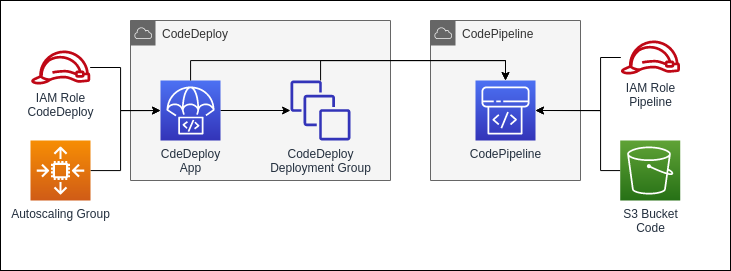
As the last step we will define the CodeDeploy and CodePipeline resources. These resource will handle the deployment of the application from the CodeCommit Repository to the instances of the target group. It will also detect code changes and automatically deploy them.
We begin with the CodeDeploy App. It will trigger the deployments on the EC2 instances. To work properly it requires an agent to be installed on all instances it should deploy on. The agent will download the built application and run the appspec.yml which lies in the root folder of the CodeCommit Repository.
 1# deploy.tf
 2
 3resource "aws_codedeploy_app" "default" {
 4  compute_platform = "Server"
 5  name             = "${var.project_name}-deploy"
 6  tags = {
 7    name    = "${var.project_name}-codedeploy"
 8    Project = var.project_name
 9  }
10}
The CodeDeploy App requires a deployment group to know on which instances it is supposed to trigger the deployment on. In our case we will target the instances of our Auto Scaling Group.
1# deploy.tf
2
3resource "aws_codedeploy_deployment_group" "default" {
4  app_name               = aws_codedeploy_app.default.name
5  deployment_group_name  = "UrlShortenerDeployGroup"
6  service_role_arn       = aws_iam_role.codedeploy.arn
7  autoscaling_groups     = [aws_autoscaling_group.default.name]
8  deployment_config_name = "CodeDeployDefault.HalfAtATime"
9}
Lastly we define the pipeline. It will connect the CodeCommit and the CodeDeploy to automatically trigger the deployment when the source code changes. When triggered, the CodePipeline will build the application and upload it to the S3 bucket we defined earlier. It will then trigger the CodeDeploy which will tell the agents to download the deployment file from the Bucket and run the deployment.
 1# pipeline.tf
 2
 3resource "aws_codepipeline" "default" {
 4  name     = "${var.project_name}-pipeline"
 5  role_arn = aws_iam_role.pipeline.arn
 6
 7  artifact_store {
 8    location = aws_s3_bucket.code_bucket.bucket
 9    type     = "S3"
10  }
11  stage {
12    name = "Source"
13
14    action {
15      name             = "Source"
16      category         = "Source"
17      owner            = "AWS"
18      provider         = "CodeCommit"
19      version          = "1"
20      output_artifacts = ["source_output"]
21      configuration = {
22        RepositoryName = "<RepositoryName>" # Enter your Repository
23        BranchName     = "<Branch>" # Enter your branch
24      }
25    }
26  }
27  stage {
28    name = "Deploy"
29
30    action {
31      name            = "Deploy"
32      category        = "Deploy"
33      owner           = "AWS"
34      provider        = "CodeDeploy"
35      input_artifacts = ["source_output"]
36      version         = "1"
37
38      configuration = {
39        ApplicationName     = aws_codedeploy_app.default.name
40        DeploymentGroupName = aws_codedeploy_deployment_group.default.deployment_group_name
41      }
42    }
43  }
44}
Deploying the Terraform Infrastructure
Now that we defined all the resources we need, we can run Terraform to deploy the infrastructure.
As the first step we initialize the Terraform project. For this we need to be in the Project Folder with
all the .tf files and run the following command:
1terraform init
This will download the AWS Provider and create the .terraform folder.
Now we can run the plan command to check if the code is valid and how the final deployment will look.
In our example there should be 33 resources to be added.
1terraform plan
1[...]
2
3Plan: 33 to add, 0 to change, 0 to destroy.
After checking the Plan we can finally deploy the infrastructure by running
1terraform apply
After Terraform is done, the CodePipeline will immediately deploy the application on the newly created EC2 instances. After this is done the web application can be reached on the URL the load balancers provides.
References and useful resources
For further information on the tools and frameworks used in this article, please check out these links: